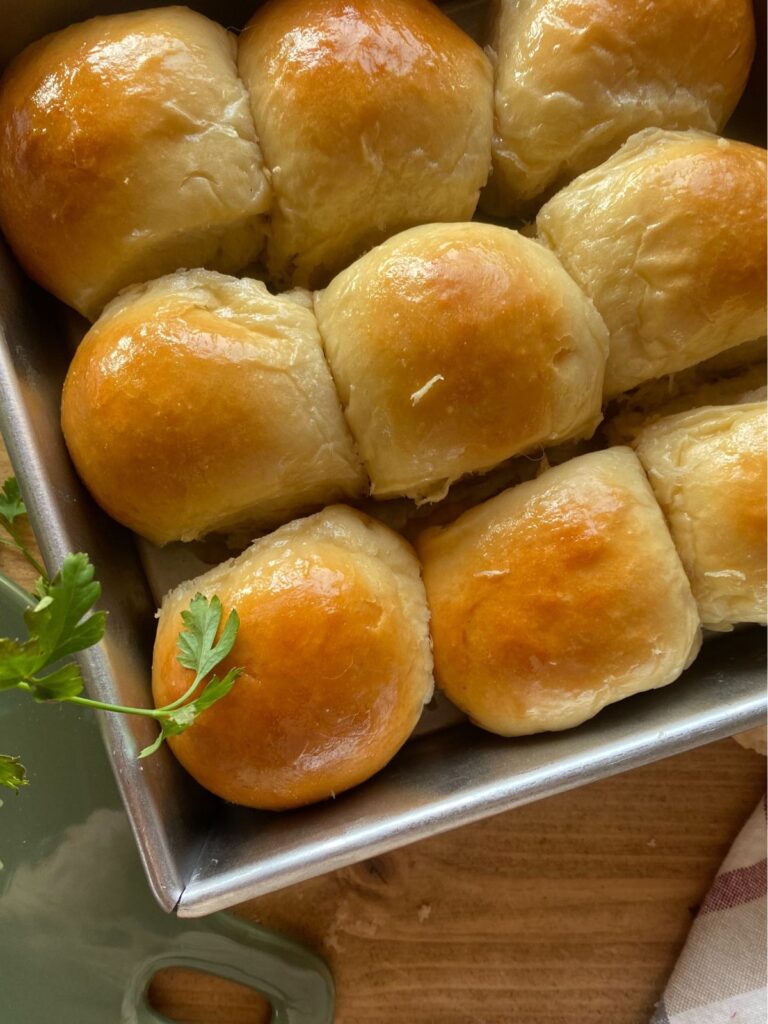
Soft and Fluffy Homemade Hawaiian Rolls
Soft, fluffy, and buttery, these homemade Hawaiian rolls are insanely simple and delicious. They come together in just a couple hours and can outshine any main dish, no questions asked! Top them with a quick homemade honey butter to make them over the top delicious.

No holiday or family dinner is complete without some sort of bread recipe involved, and these homemade Hawaiian rolls definitely take the cake for the ultimate dinner roll recipe.
They are insanely soft and fluffy, with the most delicious flaky and buttery texture. They are easy enough that they make a great beginner bread recipe, and the make-ahead option (see below) makes them perfect for Easter brunch, Thanksgiving, or Christmas.
This recipe is a spin off of my rosemary garlic dinner rolls recipe that I made last fall for Thanksgiving (divine), and honestly came out even better than I expected.
My whole family loved them, and I know you will, too!
Quick Recipe Snapshot
TOTAL TIME: About 2 ½ hours, including rise and bake time. Worth every minute!
YIELD: 12 small dinner rolls
STORAGE: Airtight container for up to 3 days. See make ahead and freezing instructions in the notes below.
BEST SERVED: Hot out of the oven with a slab of butter, or add homemade mayo and turn them into a sandwich.
Why You’ll Love These Homemade Hawaiian Rolls
Ingredients You’ll Need
This is a quick overview of essential ingredients needed for this recipe. Make sure to check out the recipe card below for the full list!
Tips for Preparing to Make This Recipe
- I highly recommend using whole milk in this recipe for the ultimate soft and fluffy rolls. I would not substitute with a lower fat milk.
- Keep a soft dough: Be careful adding in any extra flour. The dough will come together into a ball as it mixes/kneads, but still needs to be very soft to work with to ensure a light and fluffy roll.
- For best results, I recommend using bread flour because it produces softer, chewier rolls. However, you can use all-purpose flour in a 1:1 swap if that’s all you have on hand. The rolls will still be delicious.
- You can use active dry yeast or instant yeast in this recipe. The time it takes for the yeast to bloom may vary, but both will work equally well.
- Top these rolls with homemade basil butter (YUM), or make a delicious sandwich topped with some homemade avocado oil mayo.
Be sure to check out the full recipe and ingredient list below!
Step by Step Instructions
- Prepare the dough: In the bowl of a stand mixer, combine whole milk (warmed to 110-115 degrees- I use this instant read food thermometer to measure), active dry yeast, and 2 tablespoon honey. Using a whisk, mix together and let sit for 5 minutes until the yeast blooms.
- Once the yeast has bloomed, add in the pineapple juice, melted and cooled butter, beaten egg, salt, and flour, one cup at a time. Using a dough hook attachment, beat the dough on low speed for 30 seconds, scraping down the sides of the bowl as needed until all the flour has been added. Beat on medium speed until the dough comes together and pulls away from the sides of the bowl, about 2 minutes. If the dough is too wet, beat in more flour 1 tablespoon at a time until you have a workable dough. Dough should be soft, but still manageable to knead.
- Knead the dough: Keep the dough in the mixer and beat for an additional 5 minutes, or knead by hand on a lightly floured surface for 5 minutes. After kneading, the dough should still feel a little soft. Poke it with your finger—if it slowly bounces back, your dough is ready to rise. You can also do a “windowpane test” to see if your dough has been kneaded long enough: tear off a small piece of dough and gently stretch it out until it’s thin enough for light to pass through it. Hold it up to a window or light. Does light pass through the stretched dough without the dough tearing first? If so, your dough has been kneaded long enough and is ready to go!
- Once the dough is ready, you will complete the first rise. To do this, lightly grease a large bowl with oil or nonstick cooking spray (I use avocado oil). Place the dough in the bowl, turning it to coat all sides. Cover the bowl with plastic wrap, and allow to rise in a relatively warm place for 1-2 hours or until doubled in size.
- Grease a 9×13 inch baking pan. You can also bake the rolls in a well-seasoned cast iron skillet or on a lined baking sheet.
- Shape the rolls: When the dough is ready, punch it down to release the air. Using a bench scraper or a sharp knife, divide the dough into 12 equal pieces. Shape each piece into a smooth ball. Arrange in prepared baking pan and allow them to complete the second rise. Cover again with plastic wrap and allow them to rise until puffy, around 1 hour.
- Towards the end of the second rise, adjust oven rack to a lower position and preheat oven to 350° F. In a small bowl, beat together 1 egg and 1 tablespoon of milk to create an egg wash. Using a pastry brush, lightly brush the top of each roll before placing in the oven.
- Bake the rolls: Bake for 22-25 minutes or until golden brown on top. If you notice the tops browning too quickly, loosely tent with aluminum foil.
- Remove from the oven, brush with honey butter, and allow rolls to cool for a few minutes before serving. Enjoy!

Homemade Honey Butter
- Combine 2 tablespoon of softened butter and 1-2 teaspoon of honey. Stir well to mix.
- Use a pastry brush to brush the butter over top over the rolls while they are still warm from the oven.
- Enjoy!
Recipe FAQs
Hawaiian rolls are similar to a brioche dough in that they are made with milk, egg, and butter to create a higher fat, very rich dough. Pineapple juice is added to create a sweeter dough with that signature flavor.
Hawaiian rolls are similar to a brioche dough in that they are made with milk, egg, and butter to create a higher fat, very rich dough. Pineapple juice is added to create a sweeter dough with that signature flavor.
Soft dinner rolls require a rich dough, meaning they must include higher fat ingredients like whole milk, butter, and egg.
How to Serve Homemade Hawaiian Rolls
Serve these rolls with a generous slab of honey butter, or even homemade basil butter! They would also work well as a base for a sandwich or slider. Make some homemade mayo and then pile ’em high with all your favorite toppings.
Storage and Freezing Instructions
- Storage: Baked rolls will store well in an airtight container for up to 3 days.
- Make Ahead: To make ahead, prepare the dough as instructed, let it complete the first rise, and then shape and add the rolls to a prepared pan. Cover them tightly with plastic wrap and refrigerate for up to 12-15 hours. At least 3 hours before you need them the next day, remove them from the fridge and allow them to rise at room temperature for about 1-2 hours before baking.
- Freezing Instructions: Follow the make-ahead instructions and instead of refrigerating overnight, pop them directly into the freezer in the baking pan. Once frozen, they won’t stick together anymore and you can place them in a freezer safe bag if you’d like. To prepare them to bake, let them thaw and rise for about 4 hours at room temperature before baking. You can also freeze baked dinner rolls! They will store well in an airtight, freezer-safe container for up to 3 months.
Pin it For Later!

More Bread Recipes
Check out these other reader favorite bread recipes!


Soft + Fluffy Homemade Hawaiian Rolls
- Total Time: 40 minutes
- Yield: 12 rolls 1x
Description
Soft, fluffy, and buttery, these homemade Hawaiian rolls are insanely simple and delicious. They come together in just a couple hours and can outshine any main dish, no questions asked! Top them with a quick homemade honey butter to make them over the top delicious.
Ingredients
- ½ cup milk (warmed to 110 degrees)
- ½ cup pineapple juice
- 4 tbsp butter (melted and cooled)
- 1 packet active dry yeast (2 ¼ tsp)
- 1 egg (beaten)
- 2 tbsp honey
- 390 grams all purpose flour (about 3 cups)
- 1 tsp salt
- 1 egg + 1 tablespoon milk (for egg wash)
Honey Butter
- 2 tbsp butter (softened)
- 1–2 teaspoon honey
Instructions
- Prepare the dough: In the bowl of a stand mixer or a glass measuring cup, combine the milk (warmed to 110-115 degrees- I use this instant read food thermometer to measure), active dry yeast, and 2 tablespoon honey. Using a whisk, mix together and let sit for 5 minutes until the yeast blooms.
- Once the yeast has bloomed, add in the melted and cooled butter, pineapple juice, beaten egg, salt, and flour, one cup at a time. Using a dough hook attachment, beat the dough on low speed for 30 seconds, scraping down the sides of the bowl as needed until all the flour has been added. Beat on medium speed until the dough comes together and pulls away from the sides of the bowl, about 2 minutes. If the dough is too wet, beat in more flour 1 tablespoon at a time until you have a workable dough. Dough should be soft, but still manageable to knead.
- Knead the dough: Keep the dough in the mixer and beat for an additional 5 minutes, or knead by hand on a lightly floured surface for 5 minutes. After kneading, the dough should still feel a little soft. Poke it with your finger—if it slowly bounces back, your dough is ready to rise. You can also do a “windowpane test” to see if your dough has been kneaded long enough: tear off a small piece of dough and gently stretch it out until it’s thin enough for light to pass through it. Hold it up to a window or light. Does light pass through the stretched dough without the dough tearing first? If so, your dough has been kneaded long enough and is ready to go!
- Once the dough is ready, you will complete the first rise. To do this, lightly grease a large bowl with oil or nonstick cooking spray (I use avocado oil). Place the dough in the bowl, turning it to coat all sides. Cover the bowl with plastic wrap, and allow to rise in a relatively warm place for 1-2 hours or until doubled in size.
- Grease a 9×13 inch baking pan. You can also bake the rolls in a well-seasoned cast iron skillet or on a lined baking sheet.
- Shape the rolls: When the dough is ready, punch it down to release the air. Using a bench scraper or a sharp knife, divide the dough into 12 equal pieces. Shape each piece into a smooth ball. Arrange in prepared baking pan and allow them to complete the second rise. Cover again with plastic wrap and allow them to rise until puffy, around 1 hour.
- Towards the end of the second rise, adjust oven rack to a lower position and preheat oven to 350° F. In a small bowl, beat together 1 egg and 1 tablespoon of milk to create an egg wash. Using a pastry brush, lightly brush the top of each roll before placing in the oven.
- Bake the rolls: Bake for 22-25 minutes or until golden brown on top. If you notice the tops browning too quickly, loosely tent the pan with aluminum foil.
- Remove from the oven, brush with honey butter, and allow rolls to cool for a few minutes before serving. Enjoy!
- Honey Butter: Combine 2 tablespoon of softened butter and 1-2 teaspoon of honey. Stir well to mix. Use a pastry brush to brush the butter over top over the rolls while they are still warm from the oven.
Notes
- Prep Time: 15 minutes
- Cook Time: 25 minutes
Nutrition
- Calories: 209
- Sugar: 6
- Sodium: 258
- Fat: 7
- Saturated Fat: 4
- Carbohydrates: 31
- Fiber: 1
- Protein: 5
- Cholesterol: 47
If you loved this recipe for soft and fluffy homemade Hawaiian rolls, make sure to come back and leave a 5 star review! I would love to know how they turned out for you. You can tag me on Instagram with your creations @ourhandcraftedhomeblog.


These turned out SO GOOD! Delicious honey flavor and super fluffy. Just like the store-bought ones, but MUCH better ingredients!!
So glad you loved them, Trisha!
When you push x2 the flour amount doesn’t change. Otherwise great recipe
Hi Lily,
I will see what I can do to fix it. Thank you for letting me know!
Never made any sort of bread homemade before and this was so simple. Perfect for a first time bread maker.
So glad you loved the recipe, Whitnie!
I love the store-bought hawaiian rolls but after looking at the ingredients and not being able to pronounce half of them, I decided to try and make my own. I’m so glad I stumbled across this recipe through pinterest! Turned out great and the whole family loved them, thank you!!