Best Soft & Fluffy Sourdough Oatmeal Bread
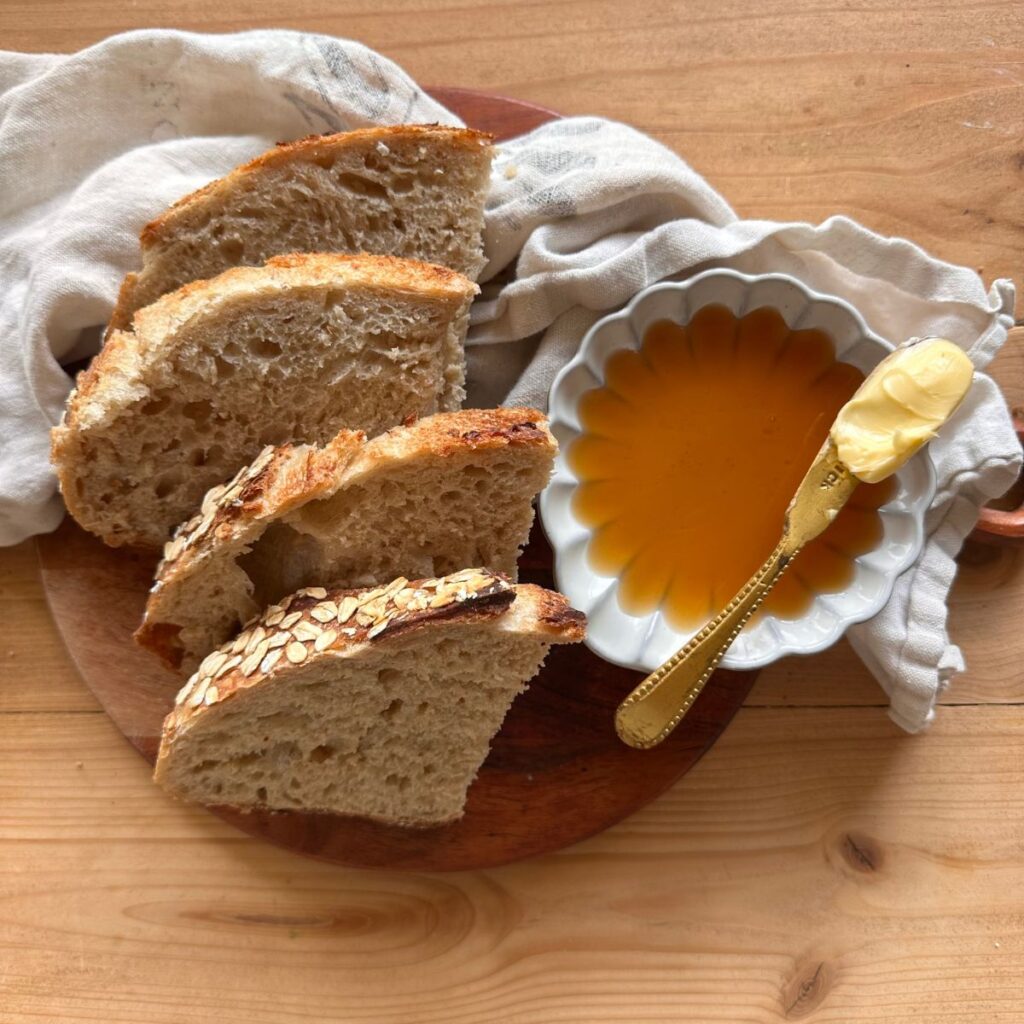
Soft and fluffy with a crusty exterior, this sourdough oatmeal bread is incredibly delicious and versatile! Honey adds a slight sweetness, while the oats add a nutty flavor and delicious texture to the exterior. Enjoy it warm from the oven with a generous slab of butter and an extra drizzle of honey.

Soft, Simple, and Super Delicious.
I’ve been on a sourdough baking spree for the past few days. I’m trying out different variations, with inclusions like blueberries and lemon, cranberry walnut, and even a cinnamon swirl!
Next up on the list? This heavenly sourdough oatmeal bread! It’s super soft and light, and is honestly the most simple to make out of all the sourdough bread recipes I’ve tried recently.
I think you’ll really like this one!

Jump to:
Quick Recipe Snapshot
TOTAL TIME: This dough gets mixed up in the morning, rests all day, and then goes through a cold proof in the fridge overnight to be ready to bake the next day. Total is about 18 hours, including bulk fermentation, cold proofing, and baking times.
YIELD: One large sourdough boule.
STORAGE: Leftovers store well in an airtight container on the counter for up to 3-4 days. Alternatively, leftovers can be used in this sourdough French toast casserole (divine).
BEST SERVED: Warm from the oven with a generous slab of salted butter. This homemade strawberry jam is also a delicious option!
Why You’ll Love This Recipe
Ingredients You’ll Need
This is a quick overview of a few essential ingredients needed for this recipe. Be sure to check out the recipe card below for the full list, as well as measurements.
Quick Tips for Making This Recipe
- Bulk Fermentation: Often considered the most finicky part of sourdough baking, because there is no one “set” time that will work for every baker. I find that my dough always takes at least 8 hours to bulk ferment properly, but generally no longer than 12. The time it takes for the dough to rise during bulk fermentation can vary depending on how warm your house is, the maturity of your starter, etc.
- Baking: If you find the bottom of your sourdough bread is getting too brown in the oven, add a thin layer of uncooked rice on the bottom of the Dutch oven before placing the sourdough bread on top and baking. This will keep the bottom from getting too brown.
- If you are wanting to bake sourdough bread the same day, it is possible! Check out my same day sourdough bread recipe here.
For tips on keeping your starter healthy and thriving, check out this post.
Sample Baker’s Schedule
Day 1:
- 9:00 AM: Mix together the dough. Cover and let sit for 30 minutes.
- 9:30 AM: Begin stretch and folds.
- 11:00 AM: Bulk fermentation.
- 7:00 PM: Pre-shape and place in the fridge to cold proof overnight.
Day 2:
9:00 AM: Bake.
Step by Step Instructions at a Glance
- Prepare the dough: In a large mixing bowl, combine the sourdough starter, water, salt, honey, and oats, whisking together to combine. Slowly add in the flour, mixing together with your hands until just combined. Allow to rest for 20-30 minutes.
- Stretch and Folds: Once the dough has had a chance to rest, begin completing your first stretch and fold. To do this, grab one edge of the dough and pull up, gently stretching it out as you pull upwards. Place this dough back into the center, and then give the bowl a quarter turn. Then grab another edge of dough, and complete another stretch and fold. Repeat two more times. This is considered one set of stretch and folds. You will do two more rounds of stretch and folds, waiting about 20 minutes in between each set.
- Bulk fermentation: Once you have completed the stretch and fold process, add the dough to a bowl or banneton basket, cover with plastic wrap or a damp kitchen towel and allow it to bulk ferment for 8-12 hours.
- Shape: Grab the risen dough out of the bowl and place it onto a lightly floured surface (dough should have roughly doubled in size and should feel very light and stretchy). Begin shaping by folding the sides of the dough onto itself, and roll up. Shape into a tight smooth ball by gently spinning it toward you. This helps to create a nice oven spring.
- Cold Proof: Add the shaped dough to a banneton basket sprinkled with a little flour, and cover tightly with plastic wrap (this is essential to keeping the dough from drying out) and place in the fridge overnight.
Preparing to Bake
- The next morning, preheat oven to 450 degrees F. Place a large cast iron Dutch oven into the oven while it preheats.
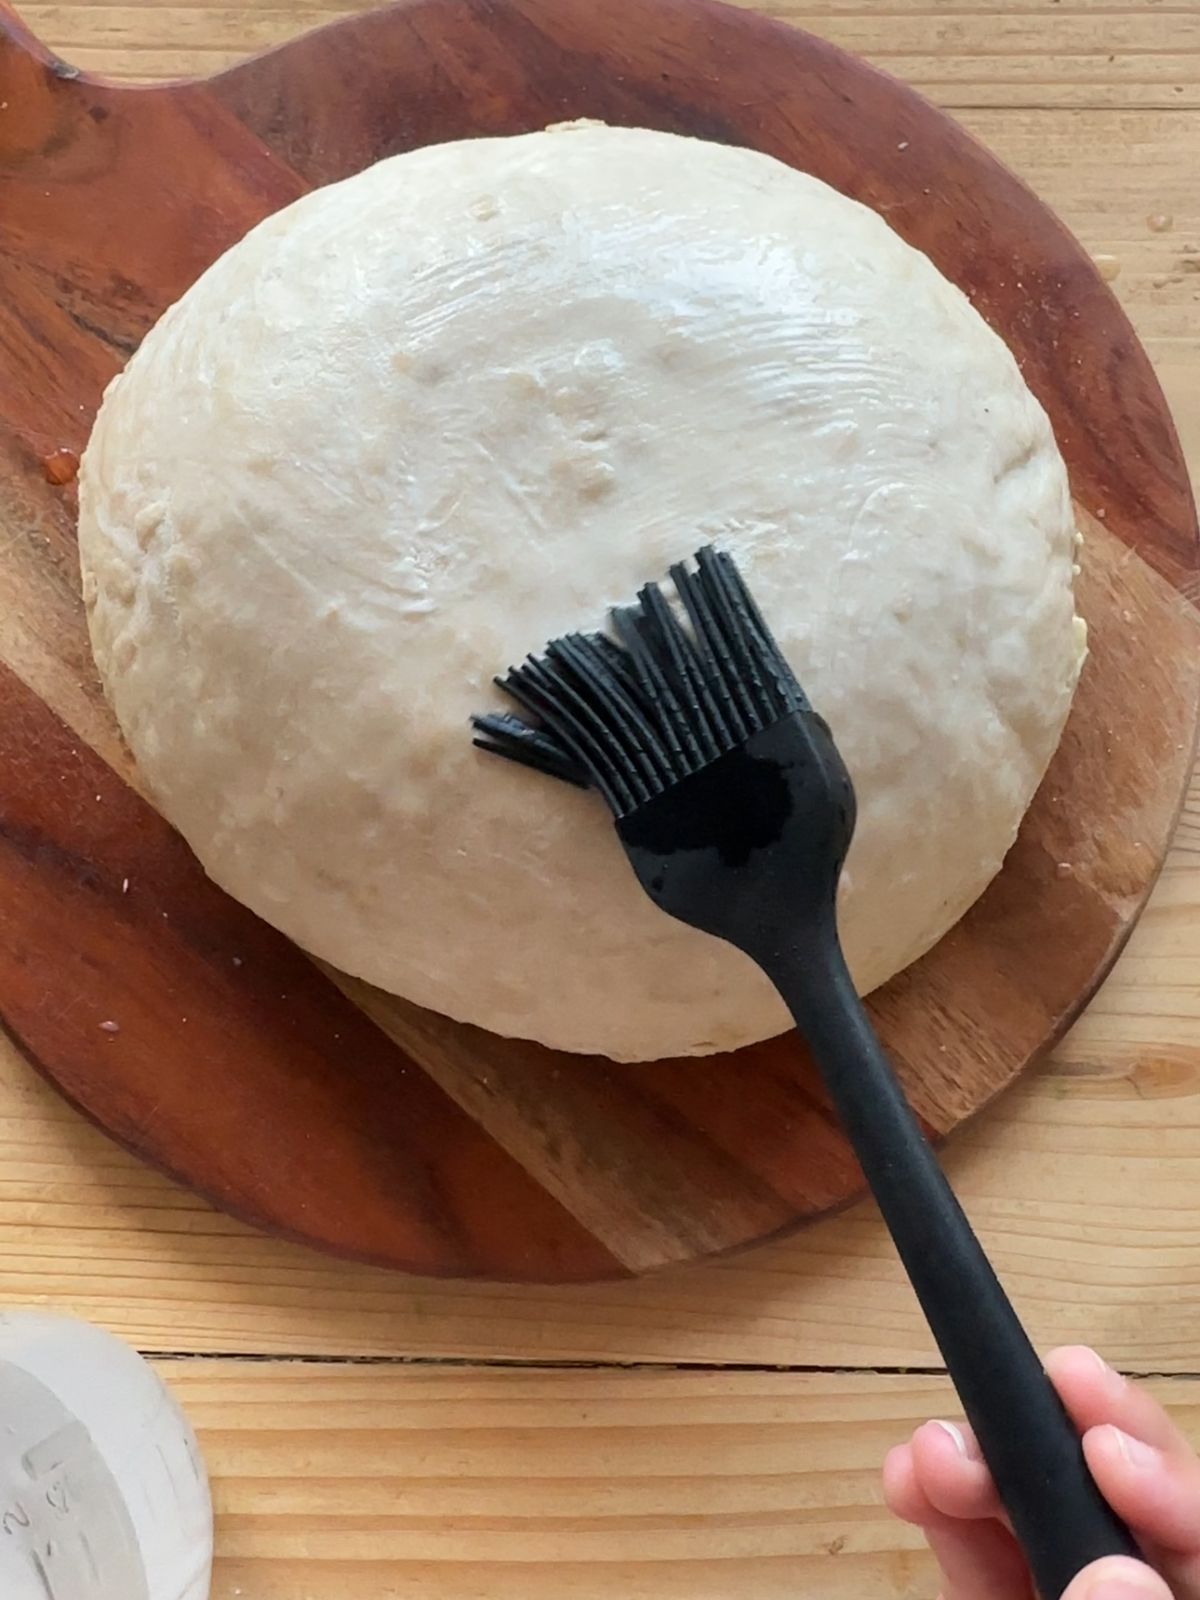
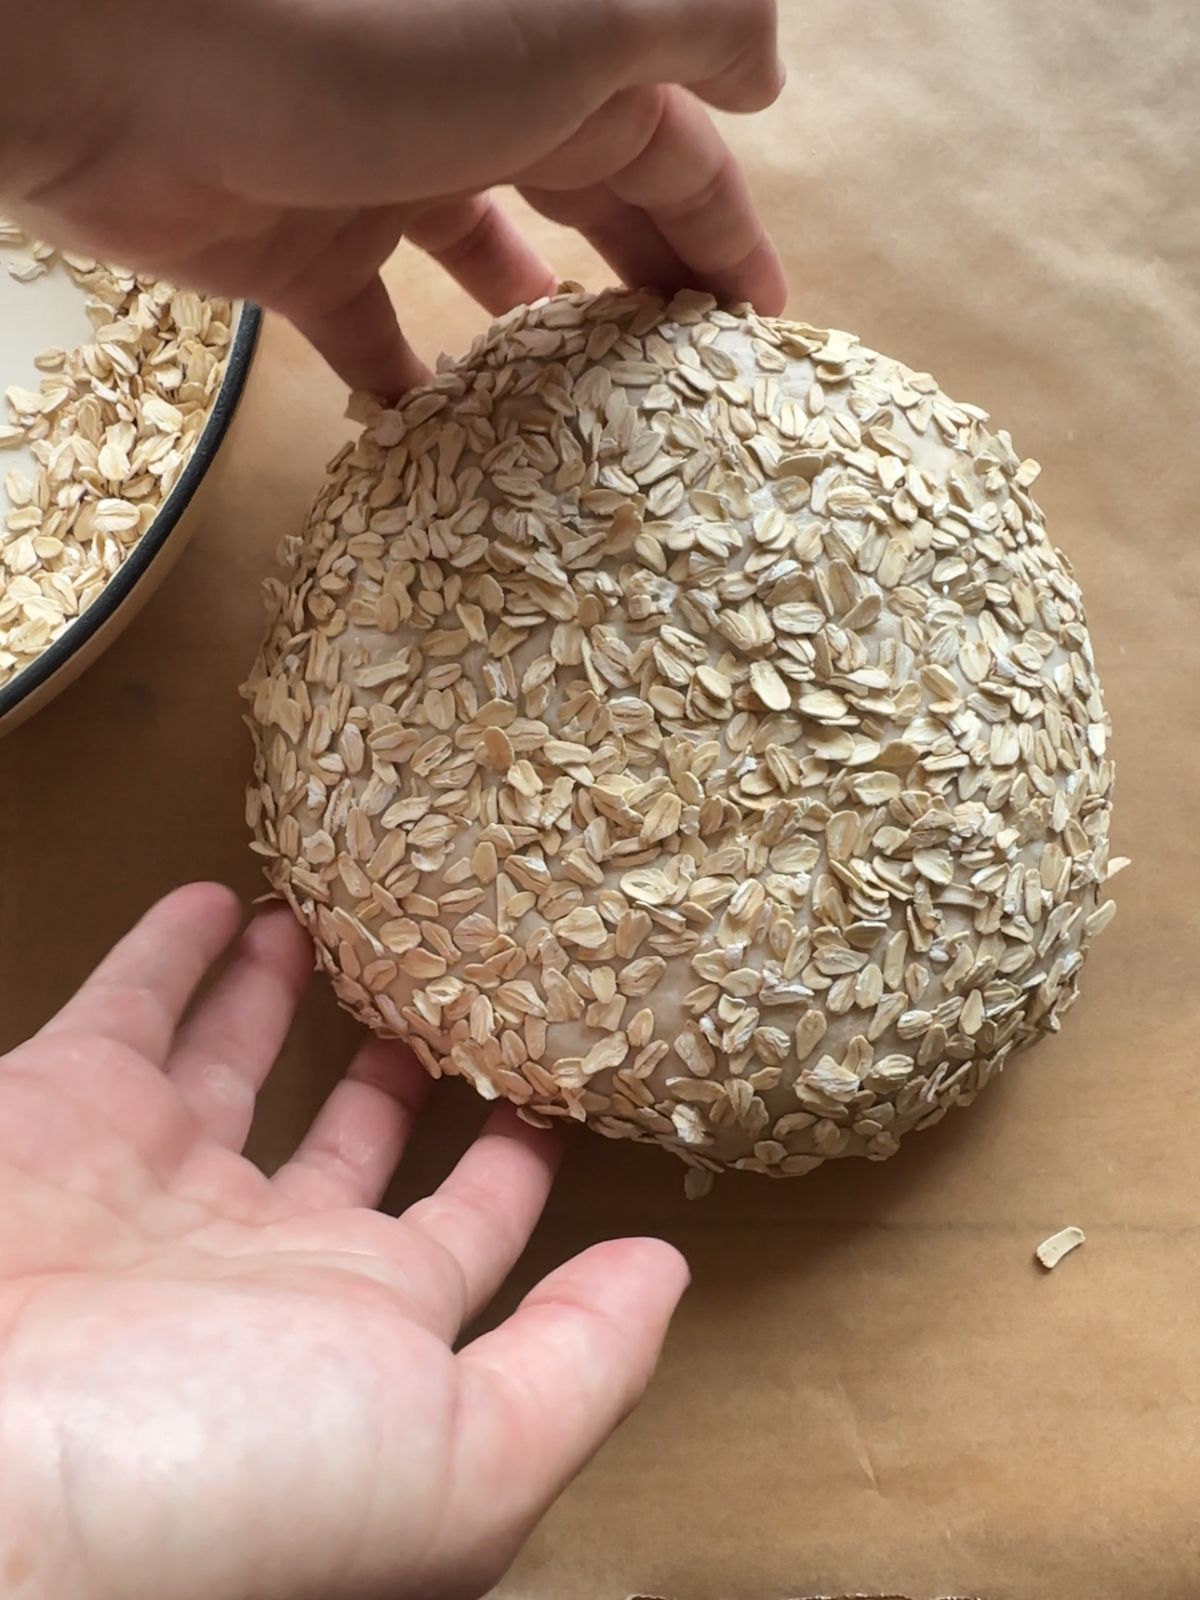
- Pull the dough from the fridge and turn it out onto a large sheet of parchment paper. Using a pastry brush, lightly brush a light layer of water over the top of the dough. Gently begin rolling the dough in the extra rolled oats, making sure to cover the entire surface. Once covered, score the dough however you wish.
- Take the preheated Dutch oven out of the oven. Carefully lower the dough, parchment paper and all, into the Dutch oven, being careful not to burn your fingers.
- Place the lid back on and bake for 30 minutes.
- Using oven mitts, remove the lid and turn the oven temperature down to 425 degrees. Bake for an additional 10-15 minutes or until golden brown on the top. To test doneness, an internal food thermometer should read 200-205 degrees F once fully baked.
How to Store Sourdough Bread
- Storing at Room Temp: Allow the bread to cool completely before slicing and placing in an airtight container (I like to use a Ziploc bag). Bread will store well in a sealed container on the counter for up to 3-4 days.
- Storing in the Fridge: Bread will store in a sealed container in the fridge for up to 1 week. To reheat, simply place slices in the toaster or warm them in the oven before enjoying.
- Freezing Instructions: Freeze slices or the entire loaf by wrapping tightly in plastic wrap, and then place in an airtight, freezer-safe container for up to 3 months. To reheat, allow the bread to thaw completely at room temperature, and then warm in the oven at 350 degrees F until warmed through.
Be sure to check out the full recipe and ingredient list below!
Recipe FAQs
No, not necessary. The oats will soften in the dough as it sits.
I highly recommend rolled oats because they will keep their texture while baking. Quick oats will dissolve too quickly into the bread.
Yes, you can. I would recommend using half whole wheat and half bread flour, so the bread isn’t too dense.

Soft & Fluffy Sourdough Oatmeal Bread
- Total Time: 0 hours
- Yield: 1 large sourdough boule 1x
Description
Soft and fluffy with a crusty exterior, this sourdough oatmeal bread is incredibly delicious and versatile! Honey adds a slight sweetness, while the oats add a nutty flavor and delicious texture to the exterior. Enjoy it warm from the oven with a generous slab of butter and an extra drizzle of honey.
Ingredients
- 300 grams filtered water (about 1 cup)
- 100 grams active starter (½ cup)
- 3 tbsp honey
- 1 ½ tsp salt
- 60 grams rolled oats (⅔ cup), plus extra for rolling
- 500 grams bread flour (3 ½ cups, can substitute all purpose if needed)
Instructions
-
- Prepare the dough: In a large mixing bowl, combine the sourdough starter, water, salt, honey, and oats, whisking together to combine. Slowly add in the flour, mixing together with your hands until just combined. Allow to rest for 20-30 minutes.
- Stretch and Folds: Once the dough has had a chance to rest, begin completing your first stretch and fold. To do this, grab one edge of the dough and pull up, gently stretching it out as you pull upwards. Place this dough back into the center, and then give the bowl a quarter turn. Then grab another edge of dough, and complete another stretch and fold. Repeat two more times. This is considered one set of stretch and folds. You will do two more rounds of stretch and folds, waiting about 20-30 minutes in between each set.
- Bulk fermentation: Once you have completed the stretch and fold process, add the dough to a bowl or banneton basket, cover with plastic wrap or a damp kitchen towel and allow it to bulk ferment for 8-12 hours.
- Shape: Grab the risen dough out of the bowl and place it onto a lightly floured surface (dough should have roughly doubled in size and should feel very light and stretchy). Begin shaping by folding the sides of the dough onto itself, and roll up. Shape into a tight smooth ball by gently spinning it toward you. This helps to create a nice oven spring.
- Cold Proof: Add the shaped dough to a banneton basket sprinkled with a little flour, and cover tightly with plastic wrap (this is essential to keeping the dough from drying out) and place in the fridge overnight.
Preparing to Bake
-
The next morning, preheat oven to 450 degrees F. Place a large cast iron Dutch oven into the oven while it preheats.
-
Pull the dough from the fridge and turn it out onto a large sheet of parchment paper. Using a pastry brush, lightly brush a light layer of water over the top of the dough. Gently begin rolling the dough in the extra rolled oats, making sure to cover the entire surface. Once covered, score the dough however you wish.
-
Take the preheated Dutch oven out of the oven. Carefully lower the dough, parchment paper and all, into the Dutch oven, being careful not to burn your fingers.
-
Place the lid back on and bake for 30 minutes.
-
Using oven mitts, remove the lid and turn the oven temperature down to 425 degrees. Bake for an additional 10-15 minutes or until golden brown on the top. To test doneness, an internal food thermometer should read 200-205 degrees F once fully baked.
Notes
- Bulk Fermentation: Often considered the most finicky part of sourdough baking, because there is no one “set” time that will work for every baker. My house is generally heated at 68 degrees, and I find that my dough always takes at least 8 hours to bulk ferment properly, but generally no longer than 12. The time it takes for the dough to rise during bulk fermentation can vary depending on how warm your house is, the maturity of your starter, etc.
- Baking: If you find the bottom of your sourdough bread is getting too brown in the oven, add a thin layer of uncooked rice on the bottom of the Dutch oven before placing the sourdough bread on top and baking. This will keep the bottom from getting too brown.
- Storing at Room Temp: Allow the bread to cool completely before slicing and placing in an airtight container (I like to use a Ziploc bag). Bread will store well in a sealed container on the counter for up to 3-4 days.
- Freezing Instructions: Freeze slices or the entire loaf by wrapping tightly in plastic wrap, and then place in an airtight, freezer-safe container for up to 3 months. To reheat, allow the bread to thaw completely at room temperature, and then warm in the oven at 350 degrees F until warmed through
- Storing in the Fridge: Bread will store in a sealed container in the fridge for up to 1 week. To reheat, simply place slices in the toaster or warm them in the oven before enjoying.
- Prep Time: 9 hours (includes bulk fermentation)
- Cold Proof (Overnight): 8-12 hours
- Cook Time: 45 minutes
- Method: Baking
If you enjoyed this recipe for sourdough oatmeal bread, be sure to come back and leave a comment and a 5 star rating! Tag me on Instagram with your creations @ourhandcraftedhomeblog.
Happy baking,