Description
Learn the steps to creating your own homemade sourdough starter! With a few simple tools and a couple of basic ingredients, it’s easy to create a thriving starter that will last for years to come.
Ingredients
Units
Scale
- 30 grams filtered water
- 30 grams flour (I recommend bread flour or all purpose)
Instructions
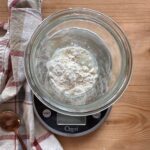
- Day 1: Begin by placing the jar on a food scale, being sure to tare it out so it is set to 0 grams. Carefully measure out 30 grams each of flour and water. Mix together the flour and water until the flour is fully hydrated. The mixture will be very thick- this is ok! Cover with an airtight lid and place in a warm spot for the next 24 hours.
- Day 2: All the starter needs today is a gentle stir. Allow it to continue sitting in a warm spot to continue the fermentation process.
- Day 3: Discard half of the mixture by tossing into the trash, then refresh by adding 30 grams each of flour and water to the remaining starter left in the jar. Stir and cover with an airtight lid. Note: It is perfectly normal for the starter to smell bad and have liquid on the top (hooch). This just means that the fermentation process is working! You can pour off the liquid before feeding or simply stir it into the starter, whichever you prefer.
- Day 4: Repeat day 3 instructions by discarding half of the starter, and then refreshing again by adding 30 grams each of flour and water. You will need to repeat this process twice today (discarding half and then feeding again), about 12 hours apart. I recommend doing it once in the morning and then again in the evening.
- Days 5-6: Repeat day 4 instructions.
- Day 7: Keep feeding twice a day as you have been for at least 14 days. At this point, you may begin to use the starter discard in recipes, rather than tossing into the trash!
- Day 14: At this point, your starter may be ready! Perform the float test to see if the starter is strong enough to bake with. To do this, feed the starter in the morning. After about 4-6 hours, the starter should have doubled in size and be at it’s most bubbly point. Fill a glass with water, then use a small spoon to scoop out a small amount of starter. Gently place it into the water. If the starter floats, it’s a good sign that it is ready to bake with. If it immediately sinks to the bottom, no worries. It just needs more time. Go through a few more feedings and then retest.
Notes
- Storage: Keep the starter in a warm spot on the counter for the first 14 days. The starter needs time to mature before keeping in the fridge to store.
- Discarding: Discarding half of the starter each day is essential to keeping a happy and healthy starter! After the first 7 days, you may begin to use your starter in a variety of sourdough discard recipes, rather than tossing into the trash.
- Prep Time: 5 minutes
- Category: Sourdough