Description
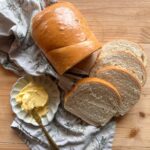
This simple honey white sandwich bread is one recipe that I make over and over again for my family. It is made with a few staple pantry ingredients, making it easy to whip up with little preparation. Soft and fluffy with just a hint of sweetness thanks to the honey, this foolproof recipe is a definite winner!
Ingredients
Units
Scale
- 2 1/4 tsp (or 1 packet) of active dry yeast
- 1/2 cup milk (warmed to 110 degrees)
- 1/2 cup water (warmed to 110 degrees)
- 3 tablespoons honey
- 2 tablespoons of very soft butter + 1 tablespoon melted to brush on the top of the baked bread
- 420 grams bread flour (about 3 cups)
- 1 1/2 tsp salt
Instructions
- Activate the Yeast: In a small bowl, combine warm milk and water, honey, and yeast. Stir to combine. Let it sit for 5-10 minutes until the yeast has bloomed.
- Make the Dough: In the bowl of a stand mixer fitted with a dough hook attachment or a large mixing bowl, combine the yeast mixture, softened butter, salt, and flour. Be sure to gradually add the flour to the mixture, about 1 cup at a time. Knead the mixture on medium-low speed until combined and sufficiently kneaded, approximately 8-10 minutes. Note: The dough is ready to rise when it comes together in a ball, is smooth and elastic, and it passes the windowpane test. To perform the windowpane test, take a small piece of dough in your fingers and stretch it apart to the point of being thin and see-through. If it breaks, it needs to be kneaded further. If it does not break, the gluten should be sufficiently developed.
- First Rise: Once the dough has been sufficiently kneaded, add it to a well oiled bowl (I use avocado oil) to complete the first rise. Cover with plastic wrap or a clean tea towel and let it sit at room temperature for 1-2 hours or until doubled in size.
- Grease a loaf pan and set aside.
- Shape & Rise Again: Once the dough has doubled, remove it from the bowl and place it on a lightly floured surface. Begin shaping the dough by pressing it out into a rough rectangle shape, about 8 x 15 inches. Begin rolling the dough towards you in a log shape, keeping it as tight as you can. Place the dough in the prepared loaf pan to complete the second rise.
- Second Rise: Cover the shaped loaf, and allow it to rise again until it’s about 1 inch above the top of the loaf pan, 1-2 hours.
- Bake the bread: Towards the end of the second rise, preheat the oven to 350 degrees. Bake for 32-35 minutes or until golden brown on top. If you notice the top browning too quickly, loosely tent the pan with aluminum foil. The bread is done when a digital food thermometer reads the center of the loaf as 195–200°F.
- Remove from the oven and allow bread to cool for a few minutes in the pan on a cooling rack before removing the bread from the pan and slicing. Enjoy!
Notes
- I highly recommend using a food scale to measure out the flour. Inexpensive and worthwhile! The precise measurement it provides makes a huge difference in obtaining the right texture for bread.
- Ingredient Temperature: I use a food thermometer to measure the temperature of the liquids. Ideally, you want the temperature to be around 110 degrees. This means the liquid is warm enough to activate the yeast, but not so hot that it will kill it. If the liquid is too hot, let it sit on the counter for a couple minutes to cool down before measuring again.
- Rise Time: The rise time of your bread can vary depending on the temperature of your kitchen.
- Baking: Lower the oven rack to a lower position when baking the bread. This will prevent the top from browning too quickly while baking.
- Storage: Cover the bread tightly with plastic wrap and store in a Ziploc bag at room temperature for up to 5 days. Bread will keep longer when stored in the fridge- up to 10 days.
- Freezing Instructions: Allow the bread to cool completely. Wrap tightly in plastic wrap or aluminum foil and then store it in a freezer safe zip topped bag. It will store well in the freezer for up to 3 months. Let it thaw in the fridge or on the counter and then reheat as desired.
- Prep Time: 2 hours 30 minutes
- Cook Time: 35 minutes
- Category: Bread Recipes
- Method: Baking
- Cuisine: American